Is your computer slowing down because too many programs load when you start up? This common issue can make your device feel sluggish and waste valuable time. To stop apps from opening at startup in Windows, go to Settings > Apps > Startup and toggle off the programs you don’t want to run automatically.
For Mac users, the process is just as simple. Right-click on any app in your dock, select Options, and uncheck “Open at Login.” By taking a few minutes to manage your startup programs, you’ll enjoy faster boot times and better overall performance.
Having fewer apps load at startup not only speeds up your computer but also saves system resources for the tasks you actually want to do. Whether you’re using Windows or Mac, controlling which programs launch when you turn on your computer is an easy way to improve your daily computing experience.
How to Stop Apps from Opening on Startup (Windows, macOS, iPhone, and Android)
Apps that launch automatically when your device starts can slow down boot times, drain resources, and clutter your desktop or phone. Fortunately, stopping them is easy across all major platforms. Here’s how to take control of startup apps on Windows, macOS, iPhone, and Android.
Windows (10 & 11)
Option 1: Using Task Manager
- Right-click the Taskbar and select Task Manager.
- Go to the Startup tab.
- You’ll see a list of apps set to run at startup.
- Right-click any app and select Disable.
Apps with “High” startup impact are good candidates to disable unless essential.
Option 2: Via Settings
- Open Settings > Apps > Startup.
- Toggle off any apps you don’t want to launch at boot.
macOS (MacBook, iMac)
Option 1: System Settings (macOS Ventura and newer)
- Go to System Settings > General > Login Items.
- Under Open at Login, click the minus (–) button to remove apps.
Option 2: Dock Shortcut
- Right-click on the app icon in your Dock.
- Hover over Options.
- Uncheck Open at Login if it’s enabled.
iPhone (iOS)
iOS doesn’t allow apps to launch automatically at boot like a desktop, but some apps may run in the background unnecessarily.
Control Background App Refresh
- Go to Settings > General > Background App Refresh.
- Toggle off apps you don’t want to run in the background.
Apps like email, fitness trackers, and social media often refresh in the background and can drain battery.
Android
Most Android apps don’t auto-start on boot, but some do depending on manufacturer and settings.
Check Startup Apps (on most Android phones)
- Go to Settings > Apps > See all apps.
- Select an app > Battery or Permissions > Disable “Run at startup” (if available).
Using Developer Options (Advanced)
- Enable Developer Mode: Go to Settings > About phone and tap Build number 7 times.
- In Developer Options, find Running services and manually stop any non-essential background apps.
Third-Party Tools (Optional)
Apps like Autostarts, Greenify, or Startup Manager can help manage auto-start behavior on rooted or advanced Android setups.
Key Takeaways
- Disabling unnecessary startup apps improves computer boot time and overall system performance.
- Windows users can manage startup apps through Settings > Apps > Startup, while Mac users can right-click apps and modify the “Open at Login” option.
- Regularly review your startup programs as new software installations often add themselves to the startup list without asking.
Understanding Startup Items
Stopping apps from opening at startup is one of the simplest ways to speed up your device and reduce clutter. Whether you’re on Windows or Mac, or just trying to manage background tasks on mobile, a few quick adjustments can give you more control and improve performance instantly.
Startup items are programs that automatically launch when you turn on your computer. These programs run in the background and can affect your computer’s performance and boot time.
Identifying Common Startup Programs
Common startup programs include:
- Productivity tools: Microsoft Office components, Slack, or Teams
- System utilities: Antivirus software, driver utilities, update managers
- Media applications: Spotify, iTunes, or media players
- Hardware controllers: Programs for mice, keyboards, and other peripherals
- Cloud services: Dropbox, Google Drive, OneDrive
You can view these programs in Windows by pressing Ctrl+Shift+Esc to open Task Manager and clicking on the Startup tab. This shows each program’s name, publisher, startup impact, and status.
Some apps start automatically but aren’t listed in the standard startup locations. These might be system services or programs that use different methods to launch at boot time.
The Impact of Startup Items on System Resources
Startup items can significantly affect your computer’s performance. Each program uses memory and processing power, even when minimized.
Resource consumption varies widely:
- Heavy programs like antivirus software might use 100-200MB of RAM
- Lighter utilities might only use 10-20MB
The biggest impact is on boot time. A computer with many startup items might take minutes to become fully responsive, while one with few might be ready in seconds.
Battery life on laptops suffers when numerous programs run in the background. Each active program draws power, reducing time between charges.
Windows labels startup items with impact ratings (None, Low, Medium, High) to help identify resource-hungry applications.
Differentiating Between Operating Systems
Windows and Mac handle startup items differently.
In Windows 10/11:
- Open Settings > Apps > Startup to view and manage startup applications
- Task Manager also provides startup management with impact ratings
- The “shell” folder contains shortcuts that launch at startup
In Windows 8:
- Task Manager is the primary tool for managing startup items
- Right-click the Start button and select “Task Manager”
On Mac:
- Go to System Preferences > Users & Groups > Login Items
- Add or remove programs using the + and – buttons
- Some items may be in the “Macintosh HD/Library/StartupItems” folder
Windows typically has more pre-installed startup items than Mac systems. Both operating systems allow users to disable unnecessary items without uninstalling the applications completely.
Disabling Startup Programs in Windows
Windows offers several methods to prevent programs from automatically launching when your computer starts up. Managing these startup programs can help your computer boot faster and use fewer resources.
Using Task Manager
Task Manager provides a simple way to manage startup programs in Windows 10 and 11. To access it, right-click on the taskbar and select “Task Manager” or press Ctrl+Shift+Esc.
In Task Manager, click the “Startup” tab to see a list of all programs that run at startup. The list shows each program’s name, publisher, and startup impact (high, medium, or low).
To disable a program, select it from the list and click the “Disable” button in the bottom-right corner. This prevents the program from launching automatically when Windows starts.
You can also see which programs have the biggest impact on your startup time. Programs labeled “High” under the “Startup impact” column slow down your boot time the most.
Navigating System Settings
Windows 10 and 11 offer a more user-friendly interface through the Settings app to manage startup programs.
To access this feature:
- Open the Settings app (Windows key + I)
- Click on “Apps”
- Select “Startup” from the left sidebar
You’ll see a list of apps that can run at startup with simple toggle switches. Each app shows its startup impact rating.
To disable an app, simply toggle the switch to “Off” position. The changes take effect the next time you restart your computer.
This method is more beginner-friendly than Task Manager and provides the same functionality with a cleaner interface.
Editing the Registry
For advanced users, the Windows Registry offers more control over startup programs. Be careful with this method as incorrect changes can cause system problems.
To use Registry Editor:
- Press Windows key + R
- Type “regedit” and press Enter
- Navigate to these keys:
HKEY_CURRENT_USER\Software\Microsoft\Windows\CurrentVersion\RunHKEY_LOCAL_MACHINE\Software\Microsoft\Windows\CurrentVersion\Run
These locations contain entries for programs that start automatically. Each entry has a name and a value that points to the program’s location.
To disable a startup item, right-click on its entry and select “Delete.” Make sure you know what you’re removing before deleting any entries.
Creating a backup before making registry changes is always recommended.
Scheduling Tasks
Task Scheduler is a powerful tool for managing programs that run at specific times, including at startup.
To access Task Scheduler:
- Press Windows key + R
- Type “taskschd.msc” and press Enter
In the left panel, navigate to “Task Scheduler Library” to see scheduled tasks. Many startup programs create tasks here instead of using traditional startup methods.
To disable a task, right-click on it and select “Disable.” You can also double-click on a task to view its properties and modify when it runs.
Look for tasks with triggers set to “At startup” or “At log on” if you’re specifically trying to reduce startup programs.
Task Scheduler is particularly useful for managing system maintenance tasks and background utilities that don’t appear in other startup management tools.
Managing Startup Items on Mac
Macs have several ways to control which apps open when you start your computer. These methods range from simple settings changes to more advanced techniques involving system files.
Utilizing System Preferences
To manage startup items on Mac, the easiest method is through System Settings (previously called System Preferences). On newer macOS versions like Ventura, go to System Settings > General > Login Items. Here you’ll see a list of all apps set to open automatically when you log in.
To remove an app from startup:
- Select the app in the list
- Click the minus (-) button below the list
This immediately stops the app from launching at startup. You can also add new items by clicking the plus (+) button and selecting an application.
When shutting down your Mac, pay attention to the checkbox that says “Reopen windows when logging back in.” Unchecking this prevents recently used apps from reopening at startup.
Exploring the Finder Application
Finder offers another way to control startup apps on your Mac. Some apps add themselves to startup without appearing in Login Items.
Check the Dock for apps with a small dot underneath them. This indicates they’re running. Right-click on the app icon and look at the Options menu. If you see “Open at Login” with a checkmark, the app is set to launch at startup.
To disable this:
- Right-click the app icon in Dock
- Go to Options
- Click on “Open at Login” to remove the checkmark
For apps that don’t show this option, you may need to check the app’s own preferences menu for startup settings.
Examining LaunchAgents and Plist Files
For more stubborn startup apps, you might need to look at LaunchAgents folders and plist files. These are more advanced methods but very effective.
LaunchAgents folders exist in several locations:
- /Library/LaunchAgents (system-wide)
- ~/Library/LaunchAgents (user-specific)
These folders contain plist files that tell your Mac which apps to start automatically. To access them:
- Open Finder
- Press Command+Shift+G
- Type “~/Library/LaunchAgents” and press Enter
Look for files named after the app you want to disable. You can move these files to another location (like your Desktop) temporarily to see if it fixes the issue. If it works, you can delete the file or move it back if needed.
Be careful when modifying system files, and consider backing up important files before making changes.
Optimizing Startup Items for Better Performance
When your computer boots up slowly, too many startup applications are often the culprit. Managing these programs can significantly improve your system’s performance and reduce boot times.
Analyzing Startup Impact
Start by identifying which programs are slowing down your startup. In Windows 10 and 11, open Task Manager by pressing Ctrl+Shift+Esc and click on the “Startup” tab. This shows all programs that launch when your computer boots.
Each application has a “Startup impact” rating: High, Medium, or Low. Programs with “High” impact consume the most resources and cause the longest delays.
Look for applications you rarely use that have high impact ratings. Also check for duplicate programs serving similar functions. For example, you might have multiple cloud storage services starting automatically.
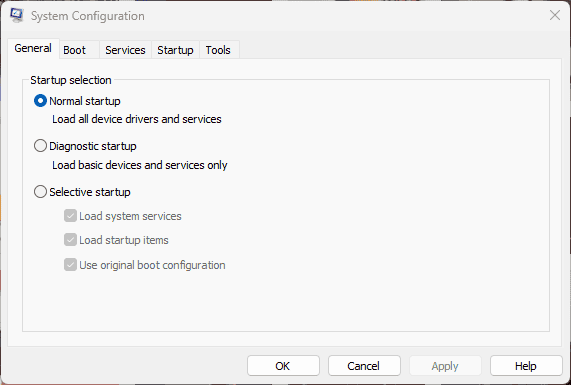
Microsoft provides built-in tools to measure exact startup times. Type “System Configuration” in the search bar and check the “Diagnostic startup” option to identify problematic applications.
Prioritizing Essential Applications
Not all startup items need to be disabled. Keep programs you use daily and those that provide critical services like antivirus protection.
To disable unnecessary startup apps:
- In Windows 10/11: Settings → Apps → Startup
- Through Task Manager: Startup tab → select app → click “Disable”
- Using Run command: Type “shell” and delete unwanted shortcuts
Consider using delayed starts for important but non-critical applications. This spreads the resource load over time rather than overwhelming your system at boot.
Productivity tools like CCleaner offer advanced startup management features that help organize startup items into groups based on importance. This makes it easier to toggle groups of applications on or off depending on your current needs.
Review your startup items every few months as new applications may add themselves to startup without your knowledge.
Cloud Storage and Startup Behavior
Cloud storage applications like OneDrive and iCloud often launch automatically when you start your computer. This can slow down your system and create unwanted popup notifications.
Managing OneDrive on Startup
OneDrive often starts automatically when you turn on your computer. To stop this behavior on Windows:
- Right-click the OneDrive icon in the taskbar
- Select Settings
- Go to the Settings tab
- Uncheck “Start OneDrive automatically when I sign in to Windows”
On Mac computers, the process is similar:
- Click the OneDrive icon in the menu bar
- Select the gear icon and choose Preferences
- Go to the General tab
- Uncheck “Open at Login”
These changes will prevent OneDrive from using system resources during startup. You can still open the app manually when needed.
Handling Cloud Services’ Impact on Startup
Cloud services can consume bandwidth and memory when they launch at startup. To manage all cloud storage apps:
On Windows, use Task Manager:
- Press CTRL+ALT+DELETE and select Task Manager
- Click the Startup tab
- Find cloud storage apps (iCloud, Dropbox, etc.)
- Right-click and select “Disable”
On Mac:
- Go to System Preferences > Users & Groups
- Select your user account
- Click Login Items
- Select the cloud storage app and click the minus (-) button
Consider which cloud services you need immediately. Some apps have settings to delay startup or run with reduced features. This helps balance convenience with system performance.
Frequently Asked Questions
Managing startup applications can save computer resources and improve system performance. Here are answers to common questions about controlling which programs launch when you turn on your device.
What steps are needed to manage startup applications in Windows 10?
In Windows 10, you can easily control which apps start automatically. Go to Settings by clicking the Start menu and selecting the gear icon. Click on “Apps” and then select the “Startup” tab.
You’ll see a list of apps that can launch at startup. Each app has a toggle switch and shows its impact on startup performance. To prevent an app from launching at startup, simply toggle the switch to “Off” for that program.
Can I prevent programs from automatically launching when I start my Mac?
Yes, you can stop apps from auto-launching on your Mac. In macOS Ventura, right-click on the app in the Dock that you want to manage. Select “Options” from the menu that appears.
Uncheck the “Open at Login” option to prevent the app from starting automatically. You can also access more login items by going to System Preferences > Users & Groups > Login Items tab. Select unwanted apps and click the minus (-) button to remove them.
Where can I find and modify startup program settings in Windows 7?
In Windows 7, use the System Configuration tool to manage startup programs. Click the Start button and type “msconfig” in the search box, then press Enter.
When the System Configuration window opens, click the “Startup” tab. You’ll see a list of all programs that start when Windows boots. Uncheck the box next to any program you don’t want to start automatically, then click “Apply” and “OK.”
Is there a way to stop certain apps from auto-starting on an Android device?
Android devices allow you to manage auto-starting apps through the settings menu. Open “Settings” and look for “Apps” or “Applications.”
Select the app you want to manage and look for options like “Auto-start” or “Background activity.” You can disable these permissions to prevent apps from starting automatically. Some Android phones also have a dedicated “Startup Manager” in settings.
How do I alter startup app preferences in Windows 11?
Windows 11 startup settings are similar to Windows 10. Open Settings by pressing Win+I or clicking the Start menu and selecting the Settings gear. Select “Apps” from the left sidebar, then click “Startup.”
You’ll see a list of apps with toggle switches. Each app shows its impact on startup time. Switch off any apps you don’t need at startup. This helps your computer boot faster and use fewer resources.
What method can I use to prevent Discord from automatically starting up?
Discord has its own setting to control automatic startup. Open Discord and click the gear icon near your username to access Settings. Look for the “Windows Settings” section.
Find the option that says “Open Discord” and uncheck “Start Discord when you start your computer.” You can also disable Discord from your system’s startup settings using the methods described for your operating system.