Windows 11 comes with numerous pre-installed apps and features that many users may not find useful. These extra components can slow down the system and take up valuable storage space. Debloating Windows 11 involves removing unnecessary elements, which can enhance performance and free up disk space. This process is not limited to uninstalling apps; it also includes disabling telemetry, reducing background processes, and adjusting system settings. As a result, debloating can significantly improve the speed and responsiveness of your Windows 11 PC.
To debloat Windows 11 yourself, first start by checking for bloatware in the Windows Settings app. Open the Settings app from the Start menu, click on “Apps” in the left sidebar, and then select “Installed Apps.” Here, you can click on the ellipsis (three dots) next to each app to view the options for uninstalling them.
Several tools are available to help users debloat their systems. The Win11Debloat script offers a comprehensive solution, removing bloatware apps and disabling features such as Bing integration and Copilot. Another option is WinUtil, which provides a user-friendly interface for various system optimizations.
Debloating Windows 11
Debloating Windows 11 can significantly improve its performance by removing unnecessary apps and features that consume resources. Here are some of the best tips to debloat Windows 11:
1. Uninstall Unwanted Apps:

- Settings App: The most straightforward way to remove bloatware is through the Windows Settings app. Go to Start > Settings > Apps > Installed apps. Scroll through the list and uninstall any apps you don’t need.
- Control Panel: For older programs, you might need to use the Control Panel. Search for “Control Panel” in the Start Menu, then go to Programs > Uninstall a program.
2. Disable Startup Apps:
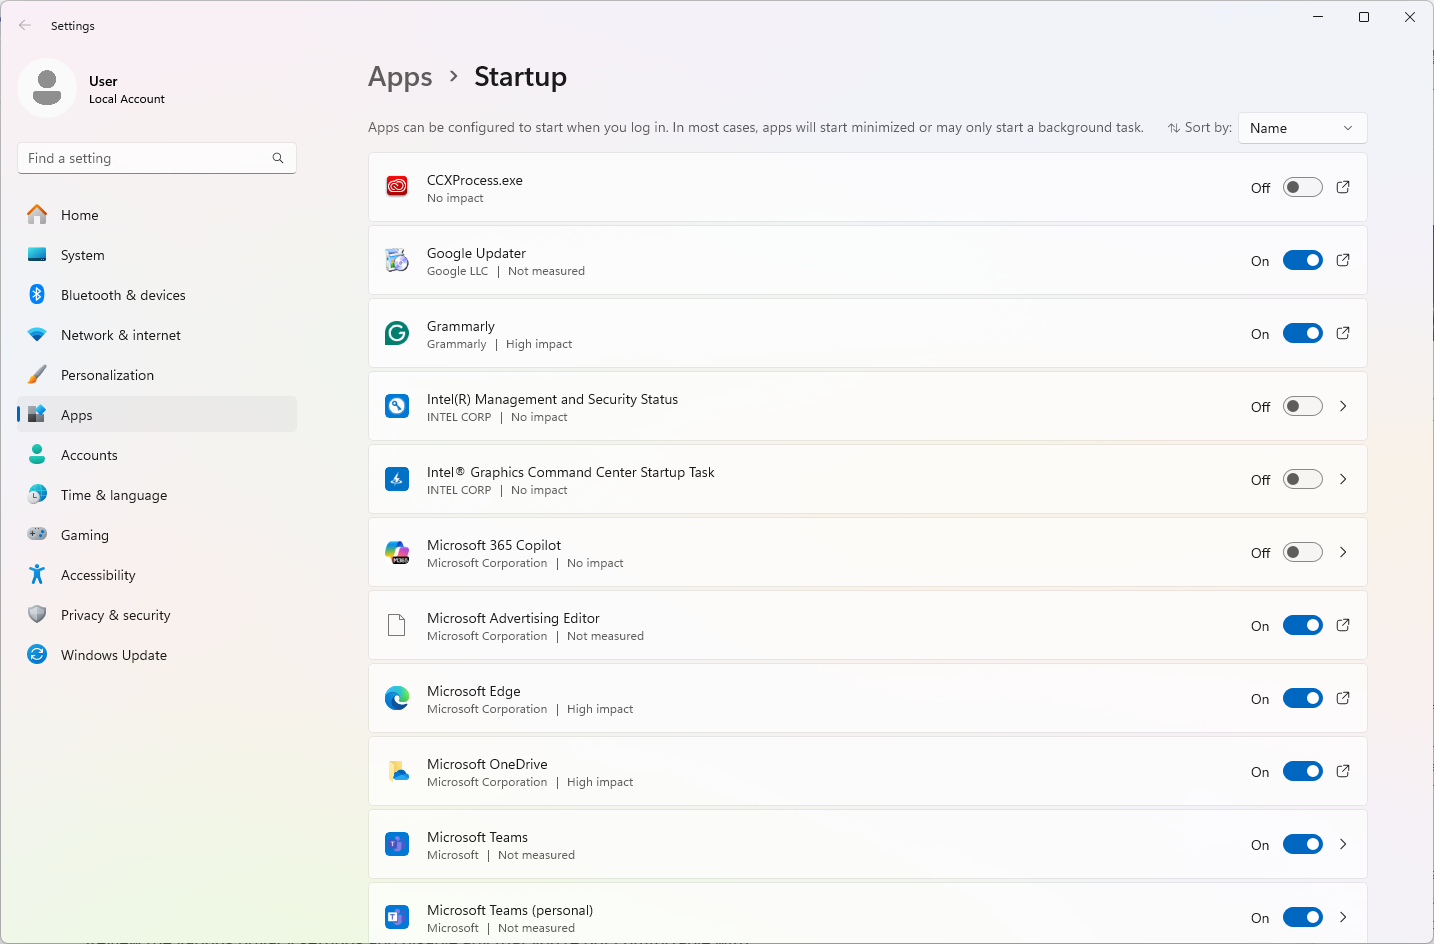
- Many apps automatically run in the background when you start your computer, slowing down the boot process. To disable them, go to Start > Settings > Apps > Startup. Toggle off any apps that you don’t need to launch at startup.
3. Disable Optional Features:
- Windows 11 includes several optional features that you might not use. To disable them, search for “Turn Windows features on or off” in the Start Menu. Uncheck the boxes next to features you don’t need and click “OK”.
4. Adjust Privacy Settings:
- Windows 11 collects a lot of data by default. To reduce this, go to Start > Settings > Privacy & security. Review the various privacy settings and disable any that you’re not comfortable with.
5. Remove Temporary Files:
- Temporary files can accumulate over time and take up valuable disk space. To remove them, go to Start > Settings > System > Storage. You can use Storage Sense to automatically delete temporary files, or manually delete them using Disk Cleanup.
6. Use Third-Party Tools (With Caution):
- Several third-party tools can help you debloat Windows 11 more aggressively. However, use these tools with caution, as they can sometimes cause instability if used incorrectly. Some popular options include:
- Win11Debloat: A PowerShell script that automates many debloating tasks.
- Windows Utility: A tool by Chris Titus Tech that offers various customization and debloating options.
Important Notes:
- Create a System Restore Point: Before making any significant changes to your system, it’s always a good idea to create a system restore point. This will allow you to revert to a previous state if something goes wrong.
- Research Before Removing: If you’re unsure about what a particular app or feature does, research it before removing it. You don’t want to accidentally disable something important.
- Be Selective: Don’t remove everything you see. Focus on apps and features that you know you don’t need.
By following these tips, you can debloat Windows 11 and improve its performance. Remember to be cautious and research before removing anything you’re unsure about.
Key Takeaways
- Debloating Windows 11 improves system performance and frees up storage space
- Tools like Win11Debloat and WinUtil simplify the debloating process
- Careful preparation and research are essential before modifying system settings
Preparing to Debloat Windows 11
Before debloating Windows 11, some essential steps ensure a smooth process. These preparations safeguard your system and set up the necessary tools for effective bloatware removal.
Creating a Restore Point
A system restore point acts as a safety net when making significant changes to Windows 11. To create one:
- Open the Start menu and search for “Create a restore point”
- Select the System Protection tab
- Click “Create” and name your restore point
This backup safeguards your system against potential issues during debloating. It allows you to revert changes if needed.
Restore points don’t take up much space. They’re worth creating before any major system modifications.
Using PowerShell for Debloating
PowerShell provides powerful tools for removing unwanted Windows 11 components. To prepare:
- Update App Installer from the Microsoft Store
- Open Start menu and search for “PowerShell”
- Right-click and select “Run as Administrator”
PowerShell commands can uninstall pre-installed apps and disable unwanted features. Many debloating scripts use PowerShell.
Users should exercise caution with PowerShell commands. Incorrect usage can cause system instability.
Identifying Unnecessary Apps
Windows 11 comes with various pre-installed apps. Not all are essential. To identify bloatware:
- Open Settings > Apps > Installed apps
- Review the list of installed applications
- Note apps you don’t use or recognize
Microsoft Store apps are easier to remove. Some system apps may require PowerShell for uninstallation.
Consider keeping essential Windows components. Removing critical system files can cause issues.
Research unfamiliar apps before removal. Some may be important for system functionality.
Executing Debloat Procedures
Debloating Windows 11 involves removing unnecessary apps, disabling unwanted features, and managing Microsoft Store applications. These steps can significantly improve system performance and free up storage space.
Removing Bloatware with PowerShell Script
PowerShell scripts offer an efficient way to remove pre-installed Windows bloatware. The Win11Debloat script is a popular tool for this purpose. Users can download the script from GitHub and run it with administrative privileges.
To use the script:
- Download the Win11Debloat ZIP file
- Extract the contents
- Open PowerShell as administrator
- Navigate to the extracted folder
- Run the script
The script presents options to remove various pre-installed apps. Users can customize the removal process by editing the Applist.txt file before running the script.
Disabling Unwanted Windows Features
Windows 11 includes features that some users may find unnecessary. Disabling these can improve performance and reduce system resource usage.
To disable unwanted features:
- Open the Start menu and search for “Turn Windows features on or off”
- Uncheck boxes next to unwanted features
- Click OK and restart the computer
Some features to consider disabling:
- Windows Media Player
- Internet Explorer 11
- Print and Document Services (if not using a printer)
Users should be cautious when disabling features to avoid impacting needed functionality.
Handling Microsoft Store Apps
Microsoft Store apps can contribute to system bloat. Users can uninstall or disable these apps to free up storage and reduce background processes.
Steps to manage Store apps:
- Open Settings > Apps > Installed apps
- Scroll through the list or use the search function
- Click the three-dot menu next to an app
- Choose “Uninstall” for removable apps or “Advanced options” for system apps
For system apps that can’t be uninstalled:
- Go to Advanced options
- Turn off “Run at startup” to prevent the app from launching automatically
- Use the “Reset” option if the app is malfunctioning
Users should be mindful of which apps they remove, as some may be necessary for system functionality.