Transferring Windows to a different drive can significantly improve your computer’s performance. This process, known as system migration, enables you to move your entire Windows operating system to a new storage device without having to reinstall the operating system or your applications. This saves you both time and effort. Many users choose to migrate to upgrade from a traditional hard drive to a faster solid-state drive (SSD), which can greatly enhance your computer’s speed and responsiveness.
This practical solution allows you to extend the lifespan of your current system without the need to purchase a new machine. Before you begin the migration process, it’s essential to back up your data. You will also need to decide whether to use Windows’ built-in tools or third-party software for the transfer. Each method offers its own advantages, so the best choice will depend on your specific needs and your level of technical expertise.
Moving Windows to Another Drive
Moving your Windows installation to a new drive can be useful for upgrading to a larger or faster drive, or for creating a backup of your system. Here’s a step-by-step guide to help you through the process:

1. Prepare the New Drive
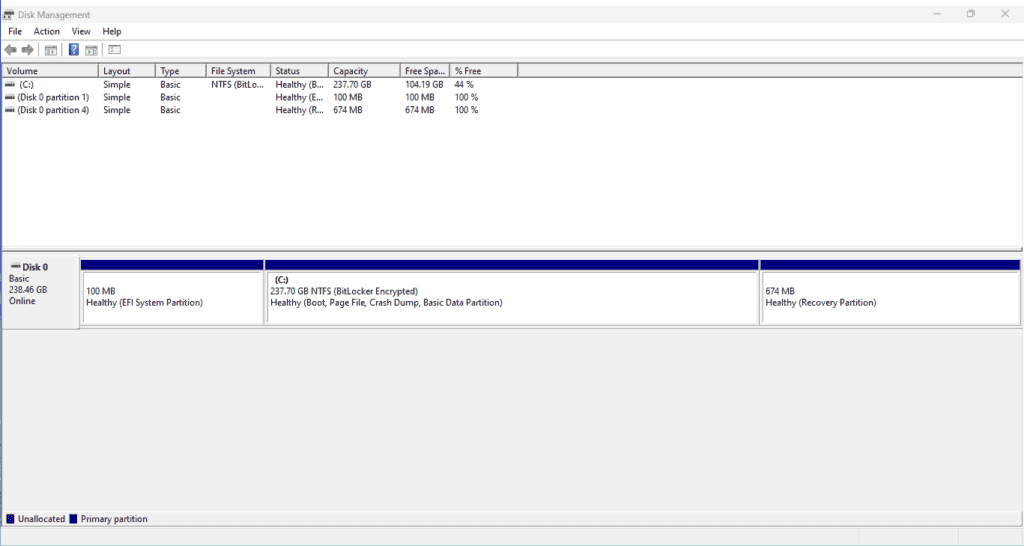
- Connect the new drive: Connect your new drive to your computer. Make sure it’s recognized in Disk Management (search for “Disk Management” in the Windows search bar).
- Initialize the drive: If the new drive is not initialized, you’ll be prompted to do so in Disk Management. Choose the appropriate partition style (GPT for UEFI systems, MBR for legacy BIOS systems).
- Allocate space: Create a new partition on the new drive with enough space to accommodate your Windows installation and any other files you want to move.
2. Clone Your System Drive
- Choose a cloning tool: Download and install a reliable disk cloning software like Macrium Reflect, EaseUS Todo Backup, or Clonezilla.
- Select source and destination: In the cloning software, select your current system drive (usually C:) as the source and the new partition on your new drive as the destination.
- Start the cloning process: Follow the on-screen instructions to initiate the cloning process. This may take some time depending on the size of your system drive.
3. Boot from the New Drive
- Change boot order: Restart your computer and enter the BIOS/UEFI settings (usually by pressing Del, F2, or F12 during startup). Change the boot order to prioritize the new drive.
- Verify the boot: Save the BIOS/UEFI settings and exit. Your computer should now boot from the new drive.
4. Clean Up the Old Drive (Optional)
- Wipe the old drive: Once you’ve confirmed that Windows is running correctly from the new drive, you can wipe the old drive to free up space or repurpose it.
| Step | Description |
|---|---|
| Prepare the new drive | Connect, initialize, and allocate space |
| Clone your system drive | Use disk cloning software to copy the system partition |
| Boot from the new drive | Change boot order in BIOS/UEFI settings |
| Clean up the old drive (optional) | Wipe or repurpose the old drive |
Important Notes:
- Backup your data: Before you start, back up all your important data to an external drive or cloud storage to prevent data loss in case of any issues during the process.
- GPT vs. MBR: Choose the correct partition style for your system. GPT is recommended for newer UEFI systems, while MBR is for older legacy BIOS systems.
- Secure Boot: If you have Secure Boot enabled in your BIOS/UEFI settings, you might need to disable it temporarily during the cloning process.
Moving your Windows installation to a new drive can seem daunting, but with careful planning and the right tools, it can be a straightforward process. Remember to back up your data and follow the instructions carefully to ensure a successful migration.
Additional Tips:
- Consider a fresh install: If you’re moving to a significantly larger or faster drive, consider performing a fresh Windows installation instead of cloning. This can help optimize performance and avoid transferring any potential issues from the old drive.
- Check for updates: After moving Windows to the new drive, make sure to check for and install any available Windows updates to ensure your system is up-to-date.
- Optimize the new drive: Consider optimizing your new drive for performance by enabling TRIM support (for SSDs) and defragmenting the drive (for HDDs).
Key Takeaways
- Windows can be moved to a new drive without reinstalling the operating system
- Backing up data is essential before starting the migration process
- Users can choose between built-in Windows tools or third-party software for the transfer
Preparing for Migration
Moving Windows to another drive requires careful planning and preparation. The following steps will help ensure a smooth transition and protect your data during the process.
Assessing Your Current System
Before migrating Windows, it’s crucial to evaluate your current setup. Check your Windows version (Windows 10 or Windows 11) and system type (32-bit or 64-bit). This information is essential for selecting compatible tools and drivers.
Examine your storage devices. Identify the current drive hosting Windows and the target drive for migration. Disk Management can help you view drive details and partitions. Note the drive capacities and available space.
Review your installed programs and files. Determine which data you want to transfer and what can be left behind. This assessment will guide your backup strategy and help estimate the required space on the new drive.
Backup Strategies
Creating comprehensive backups is critical before migrating Windows. This safeguards your data against potential issues during the transfer process.
Full system image: Use Windows’ built-in tools to create a system image. This captures your entire system, including the operating system, programs, and personal files.
File backup: Copy important documents, photos, and other personal files to an external drive or cloud storage.
Driver backup: Export a list of installed drivers to simplify reinstallation if needed.
Test your backups to ensure they’re complete and functional. Store them on a separate, secure device.
Choosing the Right Tools
Selecting appropriate migration tools is vital for a successful Windows transfer. Consider these options:
- Built-in Windows tools: Backup and Restore, System Image Creation
- Third-party software: Macrium Reflect, Clonezilla, or Acronis True Image
For disk cloning, choose software that supports your specific drive types (HDD or SSD) and system configuration (BIOS or UEFI). Some tools offer free versions with basic features, while others require a purchase for advanced options.
Research each tool’s features, user reviews, and compatibility with your system. Select one that balances ease of use with the necessary functionality for your migration needs.
Executing the Migration
Moving Windows to a new drive involves several key steps. The process requires careful planning and execution to ensure a smooth transition.
Disk Cloning vs Clean Install
Disk cloning copies the entire contents of one drive to another. This method preserves all files, settings, and applications. A clean install, on the other hand, involves installing Windows from scratch on the new drive.
Cloning is faster and retains all data. It’s ideal for users who want to upgrade their storage without losing their setup. Clean installs provide a fresh start, eliminating old files and potential issues. They’re best for users seeking optimal performance.
Cloning software like EaseUS Partition Master can simplify the process. These tools often offer user-friendly interfaces and step-by-step guides.
Migrating to a New Drive
The migration process begins with preparing the new drive. For SSDs, users should check for firmware updates and enable TRIM in Windows for optimal performance.
Next, users must connect both drives to the computer. If using cloning software, they should select the source and destination drives carefully. The software will then copy all data to the new drive.
For clean installs, users need to create a bootable Windows USB drive. They can then boot from this drive and install Windows on the new drive. After installation, they’ll need to reinstall all applications and copy personal files.
Post-Migration Steps
After migration, users must update the boot order in BIOS. This ensures the computer boots from the new drive. To access BIOS, users typically press a key like F2 or Del during startup.
Next, they should verify that all files and applications are present and working correctly. Running Windows Update and updating drivers is crucial for optimal performance.
For cloned drives, users may need to activate Windows again. OEM licenses might require contacting Microsoft support for reactivation.
Finally, users should consider creating a new system image or backup of their freshly migrated system. This provides a restore point if issues arise later.


