Looking up your Google contacts is easier than you might think. With a few simple steps, you can find all the phone numbers and email addresses saved in your Google account. To check your contact numbers in Google, visit contacts.google.com in your browser or open the Contacts app on your device. This gives you instant access to all the contact information synchronized with your Google account.
Google Contacts works as your online address book that connects with other Google services like Gmail and Calendar. When you save contacts on your phone or tablet, they can sync across all your devices if you’ve set up proper synchronization. This means you can add a contact on your phone and see it on your computer later without any extra work.
The Google Contacts interface lets you do more than just view your contacts. You can select multiple contacts using Ctrl+A (Windows) or Command+A (Mac), export them as a file, or share them with others. You can also organize people into groups or labels to find them more easily when you need them.
Checking Your Google Account Contact Numbers
Your contact numbers on your Google Account aren’t just for account recovery. They’re also used for two-factor authentication, important security alerts, and even for connecting your devices across Google’s ecosystem. If your phone number changes and you don’t update it, you could easily get locked out of your account when you need it most.
Keeping your contact numbers up to date makes sure:
- You can recover your account quickly if you forget your password.
- You receive critical alerts about suspicious activity.
- Google services like Google Pay or Android Device Manager work properly.
- You can verify your identity without long delays.
How To Find and Review Your Contact Numbers
Checking your saved phone numbers only takes a minute. Here’s the step-by-step process:
On a Computer:
- Go to your Google Account: Visit myaccount.google.com and sign in.
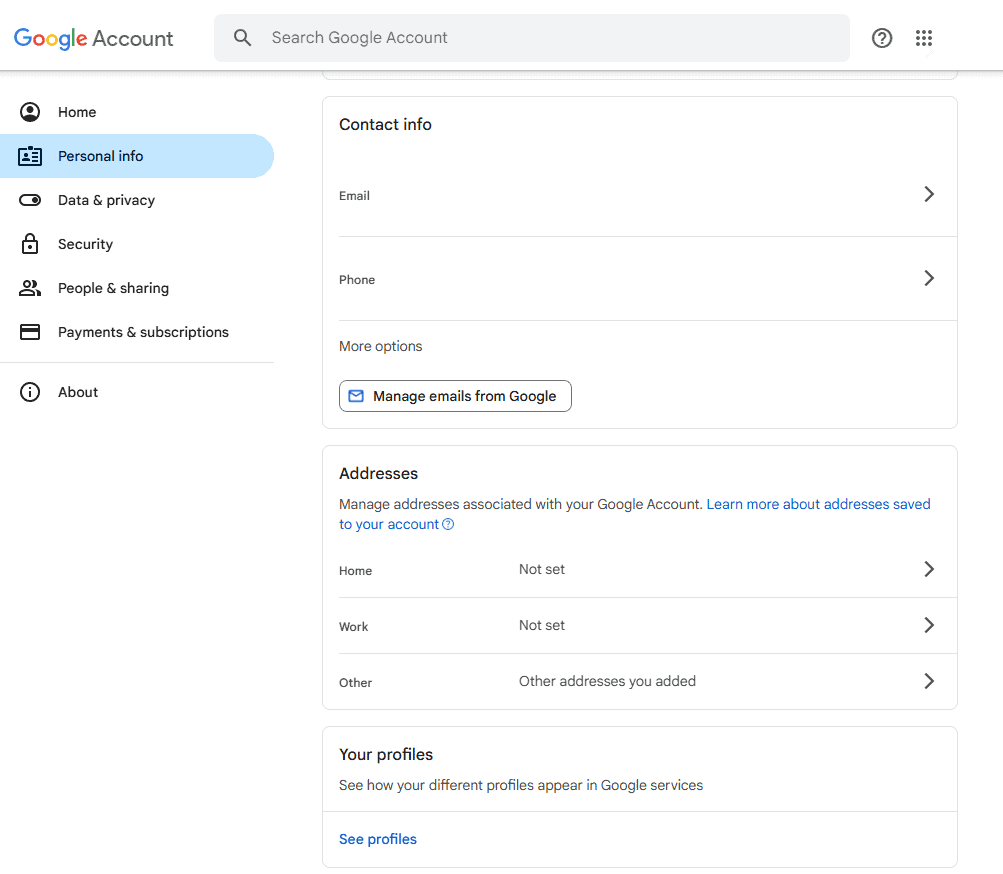
- Click on “Personal info”: You’ll find it in the left-hand menu.
- Look for “Contact info”: Under this section, you’ll see your listed phone numbers.
- Review the numbers: Make sure they are accurate and up to date. If you spot an old number, you can easily remove or update it.
On a Mobile Device:
- Open the Gmail app or Google app: Tap your profile picture in the top right corner.
- Tap “Manage your Google Account”.
- Navigate to “Personal info”.
- Scroll to “Contact info” and check your phone numbers.
- Edit if needed: Tap the number and follow the prompts to update or remove it.
How To Add or Update a Phone Number
If you need to add a new number or update an old one, here’s how:
| Step | Action |
|---|---|
| 1 | From the “Contact info” section, click Phone. |
| 2 | Choose Add a recovery phone or Edit next to your existing number. |
| 3 | Follow the on-screen instructions to verify the new number. |
Tip: Google may send a text message with a verification code, so make sure your new number is active and accessible.
What To Do If You See an Unknown Number
If you spot a phone number you don’t recognize, take action immediately:
- Remove the number by clicking Delete next to it.
- Change your password to something strong and unique.
- Turn on 2-Step Verification if it isn’t enabled already.
- Review your account activity under the “Security” tab to check for any unauthorized access.
Common Signs of Account Compromise:
| Sign | What It Means |
|---|---|
| Unexpected phone numbers listed | Someone may have added their own number. |
| Login attempts from unfamiliar locations | Your credentials might have been leaked. |
| Password change alerts you didn’t trigger | Someone may be trying to take over your account. |
Tips for Keeping Your Contact Information Secure
Keeping your Google account information safe goes beyond just checking your phone number. Here are a few smart practices:
- Use a recovery email that’s different from your main Gmail address.
- Enable 2-Step Verification to add an extra layer of protection.
- Periodically review your saved phone numbers and email addresses.
- Avoid using work or temporary numbers as your primary recovery option.
- Immediately update your number if you change carriers or lose access to your phone.
By making sure your Google Account’s contact numbers are accurate and secure, you’re taking a big step toward protecting everything from your emails to your payment methods. It’s one of the easiest but most often overlooked parts of account security.
Key Takeaways
- Access your Google contacts at contacts.google.com or through the Contacts app on your device
- Turn on contact syncing in your Google Account settings to see the same contacts on all your devices
- Use keyboard shortcuts and labels to manage multiple contacts efficiently
Accessing Your Google Account
Getting into your Google Account is the first step to checking and managing your contact numbers. The process is simple whether you’re using a computer, phone, or tablet.
Navigating to Account Settings
To access your Google Account settings, go to myaccount.google.com in any web browser. You can also get there by clicking your profile picture in the top-right corner of any Google service (like Gmail or YouTube) and selecting “Manage your Google Account.”
Once you’re in your account, look for the “People & Sharing” section. This area contains all your contact-related settings. You’ll see options for managing how your contact info is stored and shared across Google services.
If you specifically want to view your contacts, you can go directly to contacts.google.com. This takes you straight to your Google Contacts page where all your saved contact information is stored.
Signing In on Different Devices
On mobile devices, you can access your Google Account through the Google app or Gmail app. Tap your profile picture in the top-right corner and select “Manage your Google Account.”
For Android phones, you can also go to Settings > Google > Manage your Google Account.
On iPhones and iPads, download the Google app if you don’t have it. After signing in, tap your profile picture and select “Manage your Google Account.”
Remember to use the same email address and password across all devices to ensure your contacts stay synchronized. If you have two-factor authentication enabled, you’ll need to verify your identity with a code sent to your phone or email.
Managing Contact Information
Google Contacts offers several ways to organize and manage your phone numbers and other contact details. Keeping this information up-to-date ensures you can easily reach people across all your devices.
Viewing Linked Contacts
To view your contacts in Google, start by going to contacts.google.com or opening the Contacts app on your mobile device. Sign in with your Google account if needed. Your contacts will appear in alphabetical order by default.
You can see contacts saved from your various devices by checking the “Contact info from your devices” section. To find this:
- Go to your Google Account
- Navigate to the “People & Sharing” section
- Select “Contact info from your devices”
This shows contacts that have been synced from your phone or other devices. You can toggle the “Save contact info” setting on or off to control whether new contacts from your devices are automatically added to your Google account.
Adding New Contacts
Adding contacts to your Google account is straightforward. You have several options to create new entries:
On the web:
- Go to contacts.google.com
- Click the “Create contact” button (usually a plus sign)
- Fill in the person’s details
- Click “Save”
On mobile devices:
- Open the Contacts app
- Tap the plus icon
- Enter contact information
- Tap “Save”
You can add multiple phone numbers for each contact by selecting “Add phone number” and labeling each one (Mobile, Work, Home, etc.). This helps you keep track of different ways to reach someone.
Google automatically syncs these contacts across all devices where you’re signed in with the same account.
Editing Existing Contacts
When information changes, you’ll need to update your contacts. To edit a contact:
- Find and select the contact you want to modify
- Click or tap the “Edit” button (usually a pencil icon)
- Make your changes to any field
- Save the updated information
You can edit multiple fields including:
- Names
- Phone numbers
- Email addresses
- Physical addresses
- Notes
- Custom fields
Google makes it easy to add new details to existing contacts. For instance, if someone gets a new work number, you can add it rather than replacing their current number.
Remember that changes sync across all your devices automatically, so you only need to update information once.
Merging Duplicate Contacts
Over time, you might end up with duplicate contacts, especially when syncing from multiple devices. Google Contacts helps you clean these up:
On the web:
- Go to contacts.google.com
- Look for the “Merge & fix” option (sometimes under “Manage”)
- Review the suggested duplicates
- Select the ones you want to combine
- Click “Merge”
On mobile:
- Open the Contacts app
- Tap on “Fix & manage” or “Suggestions”
- Review duplicate suggestions
- Tap “Merge” for contacts you want to combine
The system automatically identifies potential duplicates based on similar names, email addresses, or phone numbers. You can review each suggestion before merging.
Merging helps keep your contact list organized and prevents confusion when trying to reach someone. After merging, all information from both contacts will be preserved in a single entry.
Syncing Contacts Across Devices
Keeping your contact information updated across all your devices is essential for staying connected. Google makes this process straightforward through its contact synchronization features.
Enabling Contact Synchronization
To sync contacts with your Google Account on Android devices, start by opening the Settings app on your phone or tablet. Tap on “Google” and then “Settings for Google apps.” Look for “Google Contacts sync” and tap on it. Make sure the toggle switch is turned on to enable synchronization.
For Samsung devices, the process is slightly different. Open the Contacts app and tap the Menu button. Navigate to “Manage contacts” and then “Default storage location.” Select your Google Account to ensure new contacts save there automatically.
When sync is enabled, any contacts you add, edit, or delete on one device will update across all devices linked to your Google Account. This includes your phone, tablet, and even when accessing contacts through Gmail on a computer.
Troubleshooting Sync Issues
If your Google contacts aren’t showing up on your device, first check if sync is enabled. Go to Settings > Google > All Services > Settings for Google Apps > Google Contacts Sync and verify the status is on.
When contacts still don’t appear, try these fixes:
- Force a manual sync – Pull down from the top of your screen and tap the sync icon
- Check internet connection – Ensure you have a stable connection
- Verify account settings – Make sure you’re signed into the correct Google Account
For persistent problems, visit contacts.google.com directly. Select all your contacts and add a new label to them. This action can trigger synchronization across your devices.
You might also need to clear cache in the Contacts app or Google Play Services if sync issues continue.
Adding Additional Accounts
Google makes it easy to manage contacts across multiple accounts. This helps you keep personal and work contacts separate while still having access to all your information when needed.
Linking Multiple Google Accounts
You can add more than one Google account to your device to access contacts from different accounts. To add another account, go to your device settings and look for “Accounts” or “Users & accounts.” Tap “Add account” and select Google. Sign in with your username and password for the additional account.
Once added, you can switch between accounts in the Contacts app. Look for your profile picture in the top corner and tap it to see all linked accounts. This lets you view contacts from any of your Google accounts without logging out and back in each time.
For Gmail users, you can also access different contact lists by clicking the Google apps button in the top-right corner, selecting Contacts, and then switching accounts using your profile picture.
Selecting Default Contact Sync Account
After adding multiple accounts, you’ll need to choose which account saves new contacts by default. On Android devices, open the Contacts app and tap the menu icon (three lines). Go to Settings and look for “Default account for new contacts.”
Choose your preferred account from the list. This setting ensures new contacts you create are saved to the right account automatically. You can change this setting anytime if your needs change.
Some phones also let you set contact sync options for each account separately. Go to Settings > Accounts > Google, select an account, and customize which data syncs. Make sure “Contacts” is toggled on for any account whose contacts you want available on your device.
Utilizing Home Screen Shortcuts
Creating shortcuts on your home screen gives you quick access to your contacts without opening multiple apps. This can save time when you need to call or message someone fast.
Creating Shortcuts to Contact Settings
Adding contact shortcuts to your Android home screen is simple. Start by touching and holding an empty area on your home screen. Tap “Widgets” from the menu that appears. Look for the “Individual contact” widget and touch and hold it.
Drag the widget to where you want it on your home screen. A list of your contacts will appear. Choose the contact you want to create a shortcut for. Some phones might ask for permission to access notifications – if prompted, allow this access.
You can repeat this process to add more contact shortcuts. Each shortcut will display the contact’s name and picture (if available). When you tap the shortcut, your phone will show options to call, text, or email that person.
For Google Pixel users, you might find different widget options like “Contact tile” or “Favorite contacts.” These work similarly but may offer different layouts or features.
These shortcuts work even when you’re offline, though you’ll need internet connection to sync any contact updates from your Google account.
Frequently Asked Questions
Google offers several ways to check and manage your contact numbers. Here are answers to common questions about finding and viewing your contacts within your Google Account.
How can I view the list of phone contacts synchronized with my Google Account?
To view synchronized phone contacts, sign in to your Google Account and go to the “People & Sharing” section. Click on “Contact info from your devices” under the “Contacts” option. Here you’ll see contacts that have been saved from your signed-in devices.
You can review these contacts and manage which ones you want to keep synced across your devices.
What are the steps to access my Gmail contact numbers?
To access contact numbers in Gmail, sign in to your Gmail account. Click on the Google Apps icon (nine dots) in the top right corner and select “Contacts” from the dropdown menu.
This will take you to Google Contacts where you can view, edit, and organize all your saved contact information, including phone numbers.
Where can I find a complete list of my contacts linked to my Google Account?
Visit contacts.google.com and sign in with your Google Account credentials. This takes you directly to Google Contacts, which serves as your online address book.
Google Contacts displays all your saved contacts in one place, regardless of which Google service or device you used to add them.
What process should I follow to check which phones are associated with my Google Account?
Log into your Google Account at myaccount.google.com. Navigate to the “Security” section and look for “Your devices.” This shows all devices currently signed in to your account.
For specific phone numbers associated with your account, go to “Personal info” and then “Phone” to see numbers you’ve added for account recovery or verification.
How do I locate my contact list within my email account on Gmail?
While in Gmail, look for the “Contacts” option. You can find it by clicking on the Google Apps icon (nine dots) in the upper right corner of your screen.
Alternatively, you can type contacts.google.com directly into your browser while logged into your Google Account to access your full contact list.
Can I review all my contact numbers across different devices through my Google Account?
Yes, Google Contacts syncs across all your devices when you’re signed in with the same Google Account. Access contacts.google.com from any device to see your complete contact list.
The sync feature ensures that any contact added or updated on one device will appear on all your devices. This makes it easy to maintain a consistent contact list regardless of which device you’re using.