Having CPU troubles can be frustrating, but Intel’s RMA (Return Material Authorization) process helps you replace faulty processors with minimal hassle. To RMA an Intel CPU, you’ll need to contact Intel support through their website, provide proof of purchase, and ship your defective processor once they approve your warranty claim. The process is straightforward, though you have options regarding how to handle the replacement timing.
Intel offers different RMA options to suit your needs. You can choose to send your CPU back first and wait for a replacement, or pay a $25 fee to receive a new processor before returning the old one. This second option is great if you can’t afford downtime. Remember that boxed CPUs are handled directly by Intel, while prebuilt PC issues should go through your computer manufacturer like HP or Asus.
Starting the RMA process is simple. Visit Intel’s support website, select “Submit a Service Request,” choose CPU as your product type, and complete the online form. Once approved, Intel will provide you with an RMA reference number that must be clearly labeled on your return package.
How To Get Warranty Service on an Intel CPU
If you’re experiencing problems with your Intel CPU, you may be eligible for warranty service. This guide will walk you through the full process of verifying your warranty, gathering information, and submitting a Return Merchandise Authorization (RMA) request to Intel.
Step 1: Identify Your CPU Type
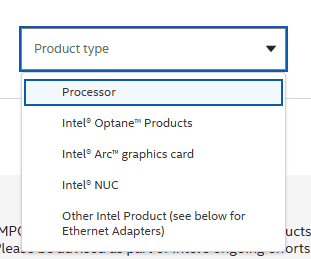
First, determine whether your CPU is a boxed or tray processor.
- Boxed CPUs are retail units bought separately and typically come with a 3-year limited warranty from Intel.
- Tray CPUs are often included in pre-built systems and are generally supported by the system manufacturer rather than Intel.
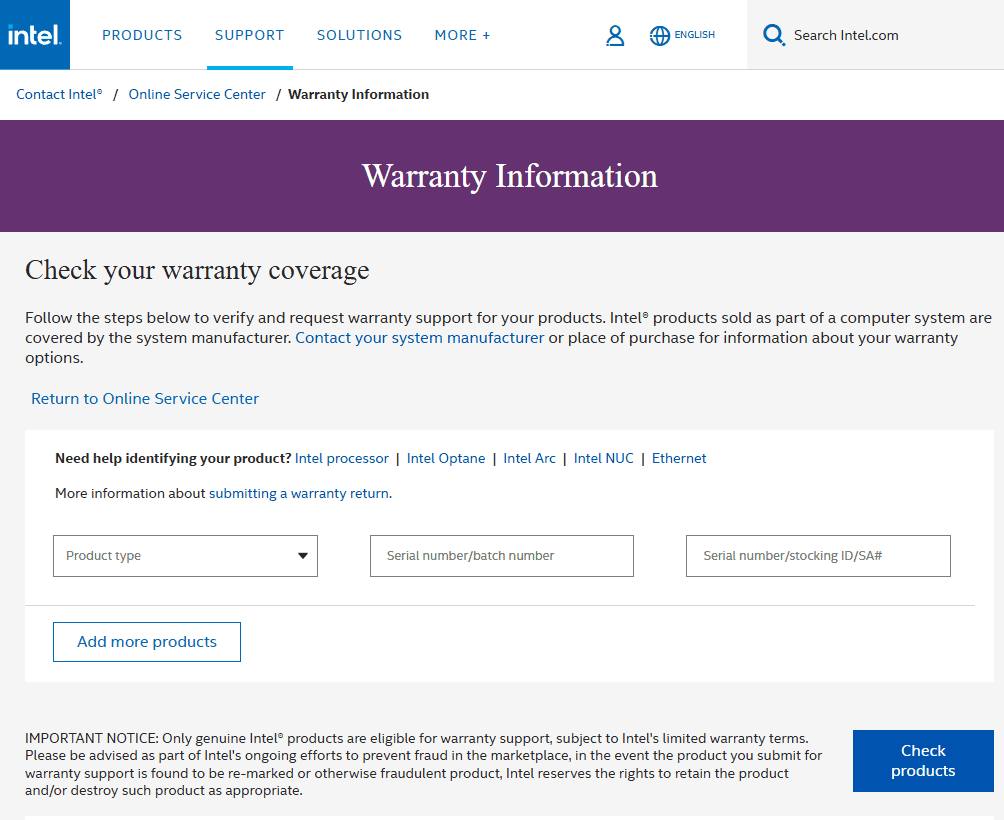
You can check your CPU’s warranty status using Intel’s Warranty Information Tool.
Step 2: Collect Required Information
Before initiating a warranty request, make sure you have the following:
- Processor model and generation
- Serial Number (ATPO) — located on the processor or original box
- Batch Number (FPO) — also found on the processor or packaging
- Proof of purchase — receipt or invoice showing the date and place of purchase
These identifiers help Intel verify your eligibility for warranty service.
Step 3: Start the RMA Process
https://supporttickets.intel.com/s/warrantyinfo
You can initiate the RMA process through multiple channels:
- Online: Submit a service request using Intel’s Online Service Center.
- Live Chat: Use Intel’s virtual assistant or support chat for guidance.
- Phone Support: Call Intel Support for your region and speak to a representative.
Be prepared to describe the issue in detail and explain any troubleshooting steps you’ve already taken.
Step 4: Choose Your Warranty Option
Intel typically provides three options depending on your location and eligibility:
- Standard RMA: You ship your defective CPU to Intel. Once it’s inspected and approved, they send you a replacement.
- Advanced Warranty Replacement (AWR): Intel sends a replacement CPU first, and you return the defective unit afterward. A temporary credit card hold may be required.
- Refund: In rare cases, a refund may be offered instead of a replacement.
Not all options are available in every country or for every processor model.
Step 5: Package and Ship Your CPU
Once your RMA is approved, follow these packaging and shipping instructions:
- Use original packaging if available. If not, wrap the CPU in anti-static material and place it securely in a sturdy box.
- Clearly mark the RMA number on the outside of the box.
- Use a reliable shipping service that offers tracking. Intel may provide a prepaid label depending on your case.
Ensure the CPU is protected to avoid damage in transit.
Step 6: Wait for Processing and Replacement
After Intel receives your CPU, they will verify the issue and determine warranty eligibility. If approved, they’ll issue a replacement or refund, typically within 7 to 10 business days.
Important Considerations
- Warranty Duration: Boxed CPUs typically have a 3-year warranty. Recently, Intel extended warranty coverage for certain 13th and 14th Gen CPUs due to stability concerns.
- Physical Damage: CPUs with visible damage, such as bent pins or burn marks, may not qualify for warranty service.
- Overclocking: Damage from overclocking or operating the CPU beyond spec may void your warranty.
- Counterfeit Products: Intel has reported cases of counterfeit CPUs being submitted. Only genuine Intel products are eligible for RMA.
Additional Tips
- Keep documentation of all communications with Intel.
- Be ready to provide system configuration details such as motherboard model, BIOS version, and RAM specs.
- Monitor Intel’s support page for updates to the RMA policy or procedures.
By following these steps carefully, you can increase your chances of a smooth and successful warranty replacement for your Intel CPU.
Key Takeaways
- Intel’s RMA process offers multiple return options including advance replacement with a $25 fee or standard returns at no extra cost.
- You must submit your service request through Intel’s support website and include your proof of purchase for warranty validation.
- Always package your CPU carefully and clearly mark the provided RMA number on the return package for proper processing.
Understanding the Intel CPU RMA Process
When your Intel CPU fails, you need to know how to get it replaced under warranty. Intel offers several options for CPU returns, with specific rules about what’s covered and for how long.
What Is an RMA for Intel CPUs?
RMA stands for Return Material Authorization, which is Intel’s process for replacing defective processors. If your CPU fails during the warranty period, you can request an RMA to get a replacement.
Intel offers flexible return options. You can:
- Send your CPU first, then receive a replacement
- Get a replacement sent first, then return your CPU (with a $25 fee)
- Request a refund instead of a replacement
The RMA process starts by checking your CPU’s warranty status on Intel’s website. Then you need to submit a warranty request through Intel’s Online Service Center, use their Virtual Assistant chat, or call their support line.
Eligible Products and Models
Most Intel processors are covered by warranty, including:
- Core series (i3, i5, i7, i9)
- Intel Xeon processors (including Ice Lake and Emerald Rapids)
- Pentium and Celeron processors
Before starting an RMA, gather your product information:
- Exact model number
- Batch number (printed on the CPU)
- Proof of purchase (receipt or invoice)
- Description of the issue
High-end processors like the Core i9 series follow the same RMA process as other models, but server CPUs like Emerald Rapids and Ice Lake might have different warranty terms.
Intel Warranty Policy Overview
Intel typically provides a 3-year limited warranty for boxed processors bought through retail channels. OEM processors (those pre-installed in computers) are usually covered by the computer manufacturer’s warranty, not directly by Intel.
The warranty covers only manufacturing defects. It doesn’t cover:
- Damage from improper installation
- Overclocking issues
- Physical damage
- Normal wear and tear
If you experience crashes like Kernel-Power 41 (63) errors, Intel will typically test your returned CPU. If they confirm a defect, they’ll send a replacement unit – either new or refurbished depending on availability.
You don’t need to register your Intel product to receive warranty service. Your warranty period starts from the date of purchase, so keep your receipt safe.
Step-by-Step Guide to Requesting an Intel CPU RMA
Getting a replacement for your faulty Intel CPU involves several key steps that help ensure a smooth RMA process. Intel offers warranty support for their processors through a structured system that requires proper documentation and packaging.
Preparing Your CPU and Collecting Required Information
Before starting the RMA process, check if your CPU is still under warranty. Intel processors typically come with a 3-year limited warranty from the purchase date. You’ll need:
- Proof of purchase (receipt or invoice)
- The CPU’s batch number (found on the processor)
- Product serial number
- Your complete contact information
Remove the CPU carefully from your motherboard. Clean off any thermal paste using isopropyl alcohol and a lint-free cloth. Be careful not to bend any pins if your CPU has them.
Take clear photos of any visible damage for your records. This documentation may help if questions arise during the warranty claim process.
Place the CPU in its original packaging if available. If not, use an anti-static container to prevent electrical damage during shipping.
Submitting an Online Warranty Request
Visit Intel’s support website at intel.com/support to begin your warranty claim. Look for the “Products” section or use the search function to find warranty information.
Select your specific processor model from the products list. This ensures you receive the correct support options for your CPU.
Click on “Ask Intel Virtual Assistant” or “Contact Support” to access the RMA request form. You may need to:
- Create an Intel account if you don’t already have one
- Enter your product details including the serial number
- Describe the issue you’re experiencing in detail
- Upload any relevant photos showing the problem
The website will verify your warranty status based on the information provided. If approved, you’ll receive an RMA number that must be included with your shipment.
Working With Intel Product Support
After submitting your request, an Intel support representative may contact you for additional information. Be ready to describe:
- When the problem started
- What troubleshooting steps you’ve already taken
- Any error messages you received
- System configuration details
Support agents might ask you to perform specific tests to confirm the CPU is faulty. Follow their instructions carefully and provide honest feedback about the results.
If your warranty claim is approved, you’ll receive detailed instructions for returning your CPU. Save all communication from Intel for your records. Their support team can answer questions about replacement timeframes and shipping procedures.
Intel may use cookies and analytics to improve their support process, so reviewing their privacy policy is recommended.
Shipping and Tracking Your Replacement
Package your CPU securely in an anti-static bag and use proper cushioning to prevent shipping damage. Include only what Intel requests—typically just the CPU without the heatsink or fan unless specifically instructed otherwise.
Write the RMA number clearly on the outside of the package. This number is essential for processing your return correctly.
Use a shipping method that provides tracking information and consider insurance for valuable processors. Keep your tracking number and shipping receipt until the process is complete.
Intel usually ships replacement processors after receiving and inspecting the returned CPU. Some cases may qualify for advanced replacement where Intel ships the new CPU before receiving your defective one.
Check your RMA status through Intel’s support portal using your case number. Most replacements are processed within 7-10 business days after Intel receives your CPU.
Frequently Asked Questions
Intel’s RMA process helps customers replace defective CPUs with minimal hassle. These common questions cover everything from starting the process to packaging requirements.
What is the process for requesting an RMA for an Intel CPU?
To request an RMA for an Intel CPU, visit Intel’s support website and click on “Contact Intel.” Select “Products” from the menu and choose your specific CPU model from the list.
Click on “Product Support Options” and then select “Ask Intel Virtual Assistant” to start the RMA process. You’ll need to provide details about your CPU and explain the issue you’re experiencing.
Intel offers different return options. You can send your CPU first and receive a replacement after, request a replacement before returning your defective unit (with a $25 fee), or request a refund.
How can I check the warranty status of my Intel CPU before submitting an RMA request?
To check your CPU’s warranty status, visit Intel’s warranty information page. Enter your CPU’s serial number and batch number to verify if it’s still covered.
Most Intel processors come with a three-year limited warranty from the date of purchase. The warranty covers manufacturing defects but not damage caused by improper use or overclocking.
You can also contact Intel customer support directly if you need help determining your warranty status.
What documents are required to submit an RMA claim for an Intel processor?
When submitting an RMA claim, you’ll need to provide your CPU’s model number, generation, serial number, and batch number (often listed as ATPO and FPO numbers).
Proof of purchase may also be required, especially for processors still in the early warranty period. Keep your original receipt or invoice handy.
If the CPU came with a computer, you might need the system’s information as well.
How should an Intel CPU be packaged for an RMA to ensure safe transit?
Package your CPU in an anti-static bag to prevent electrical damage. If you have the original clamshell container, use it for additional protection.
Cushion the processor with bubble wrap or foam inserts. Place everything in a sturdy box with enough padding to prevent movement during shipping.
Label the package clearly with the RMA number provided by Intel during the authorization process.
Is a purchase receipt necessary when filing for an Intel CPU RMA?
A purchase receipt is highly recommended when filing for an RMA, though it may not always be required. The receipt helps verify the purchase date and warranty period.
If you don’t have the original receipt, Intel might accept credit card statements, email confirmations, or other proof of purchase. Without any documentation, the warranty may be calculated from the manufacturing date.
Intel typically gives customers 30 days to return the defective product after RMA approval.
What steps should be taken if an Intel CPU is defective upon first use?
If your Intel CPU is defective upon first use, run basic troubleshooting first. Make sure the motherboard is compatible and that the CPU is properly seated.
Document all symptoms and error messages you encounter. Take clear photos of any visible damage to the processor.
Contact Intel support immediately with this information. For newly purchased products, you may also have the option to return it to the retailer instead of going through Intel’s RMA process.