Connecting a laptop to a projector expands the display options for presentations, movie nights, and more. You can connect your laptop to a projector using HDMI cables, VGA cables, or wireless methods. This versatility allows for easy content sharing in various settings, from boardrooms to living rooms.
HDMI connections offer high-quality audio and video transmission, making them a popular choice for modern setups. For older projectors, VGA cables provide a reliable alternative. Wireless options have also emerged, offering convenience and flexibility for those who prefer a cable-free environment.
Choosing the right connection method depends on your laptop and projector specifications, as well as your specific needs. By understanding the available options, you can select the most suitable approach for your setup and enjoy seamless projection experiences.

Connecting Your Laptop to a Projector: A Comprehensive Guide
Projectors have become increasingly common in homes and offices, serving as a versatile tool for presentations, movie nights, and even gaming. Connecting your laptop to a projector might seem daunting, but it’s actually a simple process with various options depending on your devices and their capabilities.
1. HDMI
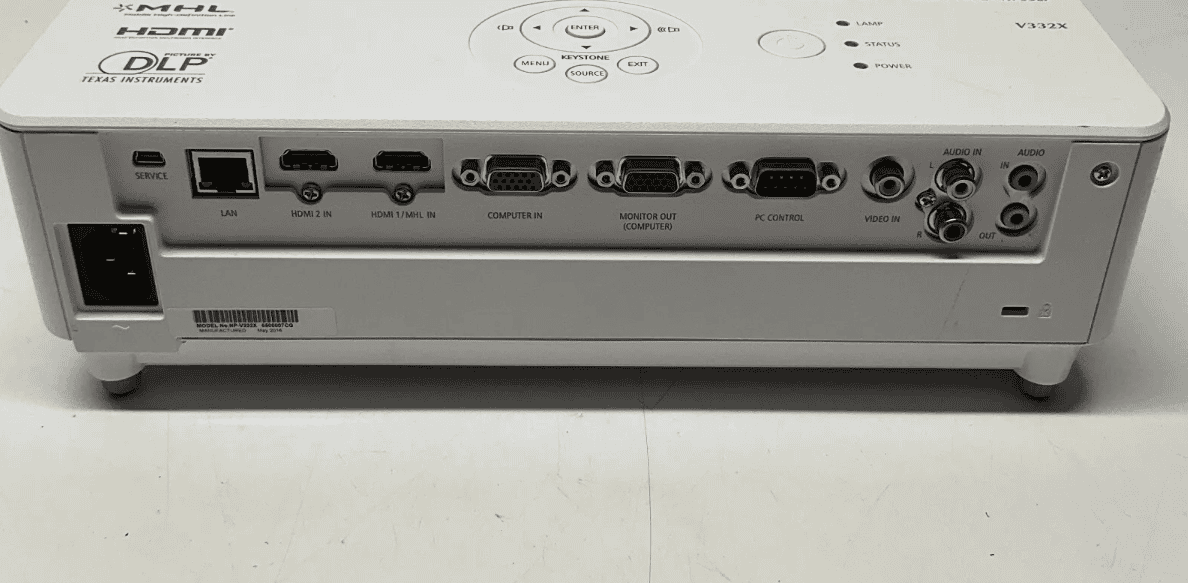
HDMI is the most common and preferred method for connecting a laptop to a projector. It offers a high-quality, all-in-one solution that transmits both audio and video signals through a single cable.
- Check for ports: Ensure your laptop and projector both have HDMI ports.
- Connect the cable: Plug one end of the HDMI cable into your laptop’s HDMI port and the other end into the projector’s HDMI port.
- Configure display settings: On your laptop, press the Windows key + P to open the display settings. Choose “Duplicate” to mirror your laptop screen on the projector, or “Extend” to use the projector as a second screen.
2. VGA
VGA is an older analog connection that only transmits video signals. If your laptop or projector only has a VGA port, you’ll need a separate audio cable for sound.
- Connect the VGA cable: Plug one end of the VGA cable into your laptop’s VGA port and the other end into the projector’s VGA port.
- Connect the audio cable: If you need audio, connect a 3.5mm audio cable from your laptop’s headphone jack to the projector’s audio input.
- Configure display settings: Follow the same steps as with HDMI to configure your display settings.
3. USB-C
Many modern laptops now feature USB-C ports, which can transmit both video and audio signals. If your laptop and projector both have USB-C ports, this is a convenient option.
- Connect the USB-C cable: Plug one end of the USB-C cable into your laptop’s USB-C port and the other end into the projector’s USB-C port.
- Configure display settings: Follow the same steps as with HDMI to configure your display settings.
4. Wireless
Some projectors offer wireless connectivity options, allowing you to connect your laptop without any cables. This can be through Wi-Fi or Bluetooth, depending on the projector’s capabilities.
- Consult the projector’s manual: Refer to your projector’s manual for instructions on how to establish a wireless connection.
- Install necessary software: You might need to install specific software or drivers on your laptop to enable wireless projection.
- Connect to the projector: Follow the on-screen instructions to connect your laptop to the projector wirelessly.
Troubleshooting
If you encounter issues connecting your laptop to the projector, try these troubleshooting steps:
- Check the connections: Ensure all cables are securely plugged in at both ends.
- Restart your devices: Restarting your laptop and projector can sometimes resolve connectivity problems.
- Update your drivers: Make sure your laptop’s graphics drivers are up to date.
- Adjust the projector’s settings: Check the projector’s input source and display settings to ensure they are configured correctly.
- Consult the manuals: Refer to your laptop and projector manuals for specific troubleshooting instructions.
Key Takeaways
- Multiple connection options exist, including HDMI, VGA, and wireless methods
- The choice of connection depends on device compatibility and user preferences
- Proper setup ensures optimal display quality for presentations and entertainment
Connecting via Wired Technologies
Connecting your laptop to a projector opens up a world of possibilities, from delivering impactful presentations to enjoying immersive movie nights. By understanding the different connection methods and following the appropriate steps, you can easily project your laptop’s screen onto a larger display and share your content with others.
Wired connections offer reliable and high-quality video output from laptops to projectors. These methods provide stable audio and visual transmission for presentations, movie screenings, and other display needs.
Using HDMI to Project
HDMI cables are the most common and versatile option for connecting laptops to projectors. They transmit both high-definition video and audio signals through a single cable.
To connect:
- Locate the HDMI ports on both devices
- Insert the HDMI cable into both ports
- Select the correct input on the projector
HDMI supports resolutions up to 4K, making it ideal for high-quality presentations. Most modern laptops and projectors have HDMI ports, ensuring wide compatibility.
Users should check their laptop’s display settings after connecting. Windows users can press Windows + P to quickly access projection options like “Duplicate” or “Extend” displays.
Utilizing VGA for Projection
VGA remains a popular choice for older equipment. It transmits analog video signals but doesn’t carry audio.
Steps for VGA connection:
- Plug the VGA cable into both devices
- Tighten the screws on the connectors
- Connect a separate audio cable if needed
VGA supports resolutions up to 1080p, suitable for most presentations. Users may need to adjust display settings manually for optimal performance.
VGA cables are less susceptible to digital signal interference, making them reliable for long cable runs. However, image quality may not match HDMI standards, especially for high-resolution content.
Leveraging USB-C and DisplayPort Interfaces
USB-C and DisplayPort offer advanced connectivity options for newer laptops and projectors. These interfaces support high-resolution video output and can transmit audio and even power.
USB-C connections:
- Versatile and reversible
- May require adapters for some projectors
- Support up to 8K resolution
DisplayPort features:
- High bandwidth for 4K and 8K video
- Supports multi-stream for multiple displays
- Compatible with HDMI through adapters
Both interfaces provide excellent image quality and are becoming increasingly common on modern devices. Users should check their device specifications to ensure compatibility.
Employing DVI Cables for Video Output
DVI cables offer a digital connection option that supports high-quality video transmission. They come in different types: DVI-D (digital only), DVI-A (analog only), and DVI-I (integrated digital and analog).
DVI connection process:
- Identify the correct DVI port type
- Connect the DVI cable to both devices
- Secure the connection with the screws
DVI supports resolutions up to 2560×1600, making it suitable for most presentation needs. It doesn’t carry audio, so a separate audio cable may be necessary.
While less common than HDMI, DVI remains a reliable option for older projectors and laptops. Users should consider DVI-to-HDMI adapters if their devices have mismatched ports.
Establishing Wireless Connections
Wireless connections offer convenient ways to link laptops to projectors without cables. These methods use various technologies to transmit audio and video signals wirelessly.
Implementing Wireless HDMI and Wi-Fi Technologies
Wireless HDMI adapters enable laptops to connect to projectors without physical cables. These devices plug into the HDMI ports on both the laptop and projector, creating a wireless link.
Wi-Fi Direct allows laptops and projectors to connect directly without a router. To use this:
- Enable Wi-Fi Direct on the projector
- Turn on Wi-Fi on the laptop
- Select the projector from available devices
- Follow on-screen prompts to complete pairing
Miracast technology uses Wi-Fi Direct for screen mirroring. Compatible Windows laptops can project wirelessly to Miracast-enabled projectors. Users activate screen mirroring in Windows settings to initiate the connection.
Connecting Through Bluetooth and Wireless Adapters
Bluetooth offers another wireless option for laptop-projector connections. This method works well for audio transmission but may have limitations for high-quality video.
To connect via Bluetooth:
- Enable Bluetooth on both devices
- Put the projector in pairing mode
- Select the projector from the laptop’s Bluetooth menu
- Confirm the connection on both devices
Wireless adapters provide versatility for projectors lacking built-in wireless capabilities. These plug into projector ports and create a wireless access point. Laptops connect to this network to stream content.
Some adapters support both Wi-Fi and Bluetooth, offering flexibility in connection methods. Users should check adapter compatibility with their specific laptop and projector models before purchasing.


