Garage parking sensors can malfunction, leaving you frustrated and unsure how to fix them. These handy devices help prevent bumps and scrapes when parking, but they’re not immune to issues. To troubleshoot your garage parking sensors, start by cleaning the sensors with a soft cloth to remove any dirt or debris that may be blocking their signal.
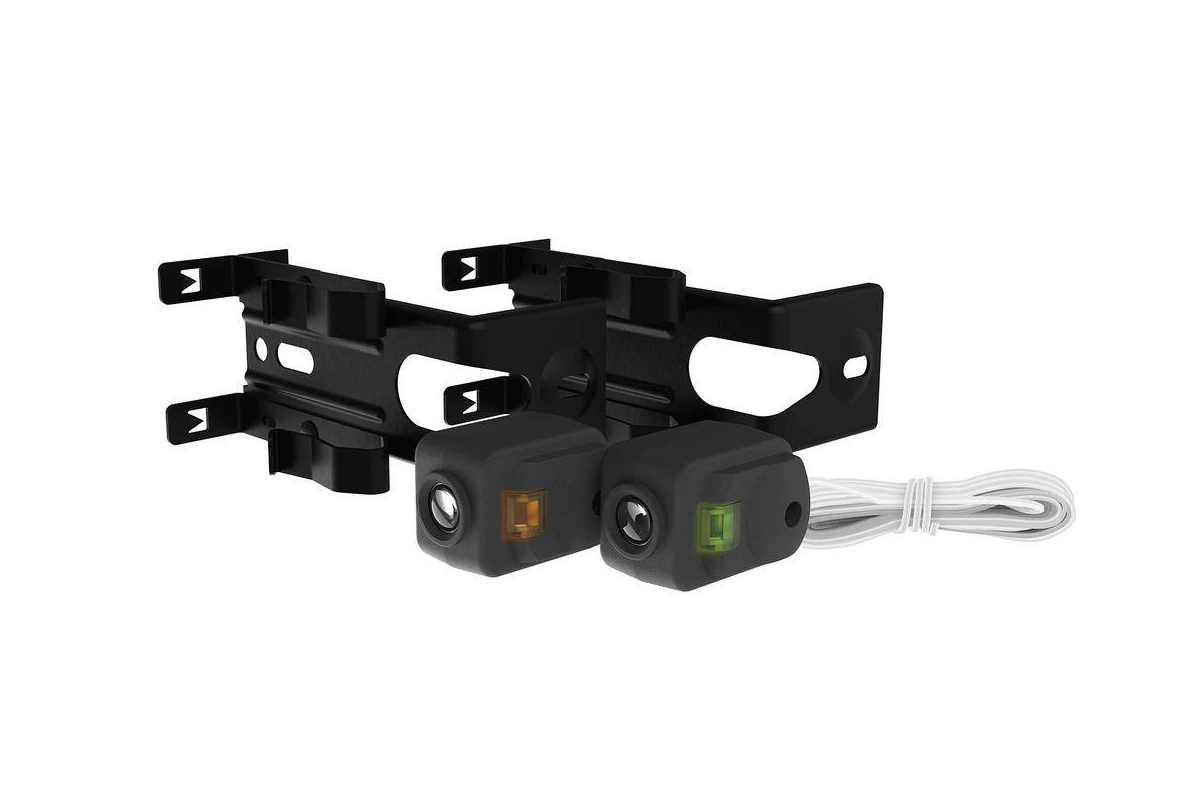
If cleaning doesn’t solve the problem, check the sensor alignment. Misaligned sensors can cause false readings or complete failure. You can adjust the sensors yourself in most cases. Look for LED lights on the sensors – one should be green (sending) and one red (receiving). If these lights aren’t on or are flickering, you may have a power issue or faulty sensor.
Wiring problems can also cause sensor malfunctions. Check for any visible damage to the wires connecting the sensors. If you spot frayed or disconnected wires, you’ll need to repair or replace them. For more complex issues, you might need to consult a professional or consider replacing the entire sensor system.
| Common Sensor Issues | Quick Fixes |
|---|---|
| Dirty sensors | Clean with soft cloth |
| Misalignment | Adjust sensor position |
| Power problems | Check connections |
| Faulty wiring | Inspect and repair wires |
| Damaged sensor | Replace sensor unit |
Troubleshooting Your Garage Parking Sensor
Common Garage Parking Sensor Problems
Garage parking sensors make parking easier. But sometimes, they stop working. This can be frustrating. Let’s look at some common problems and how to fix them.
Sensor Obstructions
Dirt, dust, or cobwebs can block the sensor. This is often the simplest fix. Gently clean the sensor with a soft cloth. Make sure the sensor is dry before testing it again. Sometimes, a small insect or leaf can get stuck. Check carefully.
Misalignment
Sensors need to point in the right direction. If they get bumped, they might not work. Check the sensor’s position. Adjust it if needed. The instructions that came with your sensor can help. A slight change in angle can make a big difference.
Wiring Issues
Loose or damaged wires are a common cause of sensor failure. Check the wiring connections. Make sure they are secure. Look for any cuts or breaks in the wires. If you find damage, you might need to replace the wires. If you are not comfortable working with wiring, it is always best to consult a professional.
Power Supply Problems
The sensor needs power to work. Check the power source. This might be a battery or a connection to your home’s electrical system. If it’s a battery-powered sensor, replace the batteries. If it’s wired in, check the circuit breaker. A tripped breaker can cut power to the sensor.
Interference
Sometimes, other electronic devices can interfere with the sensor. Try turning off nearby devices to see if that helps. LED lights, for example, can sometimes cause issues. If you recently installed something new in your garage, that could be the source of the problem.
Testing Your Sensor
After checking for these problems, test your sensor. Slowly drive your car towards the sensor. Listen for the beeps or watch for the lights. If the sensor still doesn’t work, you might need to consult the user manual or contact a professional.
Sensor Types and Features
Garage parking sensors come in different types. Some use ultrasonic waves. Others use lasers. Some have lights. Others have audible alarms. Consider which features are most important to you when choosing a sensor. Some sensors offer both visual and audio alerts.
| Feature | Pros | Cons |
|---|---|---|
| Ultrasonic Sensors | Affordable, widely available | Can be affected by temperature and humidity |
| Laser Sensors | More accurate, less affected by environment | More expensive |
| Audible Alerts | Clear warnings, good for noisy environments | Can be annoying for some |
| Visual Alerts | Easy to see, good for quiet environments | Might not be noticeable in bright light |
Choosing the Right Sensor
Think about your garage and your parking needs. If you have a tight space, you might want a sensor with a very accurate distance reading. If you have trouble seeing in the dark, a sensor with bright lights could be helpful. Consider the cost, features, and ease of installation when making your choice. Reading reviews from other users can be very helpful.
Maintaining Your Sensor
Regular maintenance can help your sensor last longer. Keep the sensor clean. Check the wiring regularly. Replace batteries as needed. If you notice any problems, address them quickly. Proper care will ensure your sensor works when you need it.
Smart Garage Door Openers
Many modern garage door openers come with built-in smart features. These features can include remote control via smartphone apps, integration with home automation systems, and even built-in cameras for monitoring your garage. Some smart openers also offer enhanced security features, such as real-time alerts if the door is left open or if there is unauthorized access. If you’re considering upgrading your garage door opener, exploring smart options can add convenience and peace of mind.
Diagnosing Common Issues
Proper diagnosis is key to resolving garage parking sensor problems. Identifying the root cause helps target repairs efficiently.
Identifying Sensor Malfunction
Parking sensor systems rely on multiple components working together. A faulty sensor can disrupt the entire system. Check for cracked or damaged sensors visually. Listen for unusual beeping patterns when objects approach.
Test each sensor individually if possible. Disconnect and reconnect sensors to ensure proper connections. Some systems have built-in diagnostic modes. Consult your manual to access these features.
Replace malfunctioning sensors promptly. Faulty units can cause false readings or system failure. Professional diagnosis may be needed for complex issues.
Checking for Obstructions
Dirt, debris, or ice can block sensor signals. Inspect sensors regularly for build-up. Clean gently with a soft, damp cloth. Avoid harsh chemicals that may damage sensor surfaces.
Check for objects stuck in sensor openings. Remove any debris carefully. Ensure nothing obstructs the sensor’s view of the garage floor.
| Common Obstructions | How to Address |
|---|---|
| Dirt and grime | Clean with damp cloth |
| Ice or snow | Defrost and wipe dry |
| Spider webs | Remove with soft brush |
| Leaves or twigs | Clear away carefully |
Retest sensors after cleaning to confirm improved performance.
Assessing Alignment and Infrared Beam
Proper sensor alignment is crucial for accurate readings. Check that sensors are securely mounted and pointed in the correct direction. Look for signs of physical damage or misalignment.
Infrared beams between paired sensors must be unobstructed. Test by placing an object between sensors. The system should detect the interruption. If not, alignment may be off.
Adjust sensor angles if needed. Small changes can have a big impact. Ensure paired sensors face each other directly. Use a level to check for proper horizontal alignment.
Consider professional realignment for persistent issues. Precise adjustment may require specialized tools or expertise.
Sensor Maintenance and Cleaning
Regular upkeep of garage parking sensors ensures their optimal performance. Proper cleaning and wiring checks are key to avoiding sensor malfunctions.
Cleaning Sensor Lenses
Clean the sensor lenses regularly to prevent false readings. Use a soft, lint-free cloth to gently wipe away dust and debris. For stubborn dirt, dampen the cloth with water or a mild cleaner.
Avoid harsh chemicals that might damage the lens coating. Check for scratches or cracks while cleaning. Replace damaged lenses promptly to maintain sensor accuracy.
Schedule monthly cleanings to keep sensors in top shape. In dusty areas, you may need to clean more often.
Evaluating Wiring Issues and Connections
Inspect sensor wiring for signs of wear or damage. Look for frayed cables, loose connections, or exposed wires. Tighten any loose connections carefully.
Test the power supply to ensure sensors receive adequate voltage. Use a multimeter to check for continuity in the wiring. Replace damaged cables immediately to prevent sensor failure.
Consider calling a professional if you’re unsure about electrical work. They can perform a thorough wiring inspection and fix complex issues safely.
| Maintenance Task | Frequency | Tools Needed |
|---|---|---|
| Clean lenses | Monthly | Soft cloth, water |
| Check wiring | Quarterly | Multimeter |
| Inspect connections | Bi-annually | Screwdriver |
Troubleshooting Advanced Problems
When garage parking sensors malfunction, complex issues may arise. These problems often require specialized knowledge and tools to resolve effectively.
Handling Misalignment and Misaligned Sensors
Misaligned sensors can cause false readings or complete failure of your garage parking system. To address this:
- Check sensor brackets for damage or looseness
- Ensure sensors are level and facing each other
- Clean sensor lenses with a soft cloth
- Adjust sensor angles if needed
Use a laser level to confirm proper alignment. If sensors won’t stay aligned, replace damaged brackets or mounts.
Malfunctioning garage door sensors may need recalibration. Consult your user manual for specific steps. Some systems have a built-in alignment mode to guide you through the process.
Professional Garage Door Repair and Diagnosis
When DIY efforts fail, seek expert help. A garage door professional can:
- Perform advanced diagnostics
- Identify hidden wiring issues
- Test control boards and power supplies
- Repair or replace faulty components
Professionals have specialized tools to pinpoint problems quickly. They can also spot potential safety hazards you might miss.
Many garage door companies offer maintenance plans. These can prevent future issues and extend the life of your system.
Parts Replacement and Professional Assistance
Sometimes, replacing parts is the best solution. Common replacements include:
| Part | Function | Signs of Failure |
|---|---|---|
| Photo eyes | Detect obstructions | Inconsistent operation |
| Control board | System brain | Erratic behavior |
| Wiring harness | Connects components | Intermittent issues |
Professional assistance is crucial for complex repairs. Experts can source the right parts and ensure proper installation. They also guarantee their work, giving you peace of mind.
When replacing sensors, match the new ones to your system’s specifications. Incompatible parts can cause more problems than they solve.
Safety and Compliance Standards
Garage door safety standards protect users from potential hazards. UL325 regulations set strict guidelines for automatic garage door systems to ensure safe operation and obstacle detection.
Understanding UL325 Regulations
UL325 regulations govern automatic garage door safety. These rules require garage doors to have safety features that detect obstacles and prevent accidents.
Key UL325 requirements include:
- Two safety sensors: One on each side of the door
- Auto-reverse mechanism: Door must reverse if it encounters an obstacle
- Constant pressure control: Door stops if button is released during manual operation
You should test your garage door’s safety features monthly. Place a solid object in the door’s path and try closing it. The door should reverse upon contact.
Table: UL325 Safety Feature Testing
| Feature | Test Method | Expected Result |
|---|---|---|
| Sensors | Block beam | Door won’t close |
| Auto-reverse | Place object in path | Door reverses on contact |
| Manual control | Release button while closing | Door stops immediately |
Regular maintenance keeps your garage door compliant with UL325. Check sensor alignment and test the auto-reverse feature often. Replace faulty components promptly to maintain safe operation.
Frequently Asked Questions
Troubleshooting garage parking sensors involves diagnosing issues, resetting systems, and understanding common problems. Here’s what you need to know about maintaining and repairing these helpful devices.
How can I diagnose issues with my garage parking sensors?
Start by cleaning the sensors with a microfiber cloth. Remove dirt and grime that may interfere with their function. Check for loose wiring connections. Inspect the sensors for physical damage.
Test each sensor individually if possible. This helps pinpoint which specific unit may be malfunctioning.
What steps are involved in resetting a malfunctioning parking sensor?
Disconnect the car battery for about 15 minutes. This resets the entire electrical system. Reconnect the battery and start the engine.
Check if the parking sensor system reactivates. If not, consult your vehicle’s manual for model-specific reset procedures.
What are common reasons for parking sensors to cease functioning?
Dirty or obstructed sensors often cause issues. Extreme weather can damage sensors. Faulty wiring or loose connections may disrupt the system.
Software glitches can also occur. In some cases, the control module itself may fail.
How can a multimeter be used to test the functionality of garage parking sensors?
Set the multimeter to measure voltage. Connect the probes to the sensor’s power and ground wires. Check if the voltage reading matches the specifications in your vehicle’s manual.
Test continuity between the sensor and control module. This verifies the wiring integrity.
How do I determine the repair costs for faulty parking sensors?
Contact local auto repair shops for estimates. Provide your vehicle’s make, model, and year. Ask about parts and labor costs separately.
Compare quotes from multiple shops. Some may offer diagnostics at a reduced fee or for free.
What should be done if a parking sensor is not emitting an audible beep during operation?
Check the system settings in your vehicle’s infotainment system. Ensure the audio alert is enabled. Adjust the volume if necessary.
Inspect the speaker or buzzer connected to the parking sensor system. It may have become disconnected or damaged.
| Issue | Possible Cause | Recommended Action |
|---|---|---|
| No beep | Disabled audio | Check system settings |
| Intermittent function | Loose wiring | Inspect connections |
| Complete failure | Faulty sensor | Replace sensor unit |
| False alarms | Dirt/debris | Clean sensor surface |